Table of Contents
- 1.1 安装概述
- 1.2 MiniKube在线环境
- 2.1 环境说明和准备
- 2.2 安装Docker环境
- 2.3 安装kubeadm组件
- 2.4 导入kubernetes镜像
- 2.5 kubeadm初始化集群
- 2.6 验证kubernetes组件
- 2.7 配置kubectl命令补全
写在前面 #
本章是kubernetes系列教程第二篇,要深入学习kubernetes,首先需要有一个k8s环境,然而,受制硬件环境,网络环境等因素,要搭建一个环境有一定的困难,让很多初学者望而却步,本章主要介绍通过kubeadm安装工具部署kubernetes集群,考虑到国内网络限制,已将安装镜像通过跳板机下载到本地,方便大家离线安装。
1. MiniKube快速部署环境 #
1.1 安装概述 #
要学习kubernetes,首先需要有一个kubernetes集群,社区为了满足不同场景下,提供了不同的安装方法以适应各种场景需求,常见方法有:
- MiniKube,是一个将kubernetes单节点安装在本地虚拟化工具,MiniKube安装文档
- 二进制安装,通过已编译好的二进制文件安装,需设置参数,可定制化强,安装难度大
- Kubeadm,一个自动化安装工具,以镜像的方式部署,使用简单,镜像在谷歌仓库,下载易失败
对于学习环境,Katacoda提供了一个在线的MiniKube环境,只需在控制台启用即可使用,当然也可以将MiniKube下载到本地使用。对于生产环境,推荐使用二进制安装或者Kubeadm,新版kubeadm目前已将kubernetes管理组件以pod的形式部署在集群中,不管用哪种方式,受限于GFW,大部分镜像下载,大家自行补脑和解决,本文以离线的方式安装部署,根据安装版本下载对应的安装镜像倒入系统即可。
1.2 MiniKube在线环境 #
Katacoda使用MiniKube提供了一个在线部署kubernetres环境,当然也可以基于MiniKube本地安装,如果是初学者想初探一下kubernetes的功能,可以使用Katacoda提供的线上环境,达到快速入门学习的目的。参考文档,直接在Hello MiniKube文档中点击Open terminal即可自动创建一个kubernetes环境,其会自动拉取镜像并部署所需环境。
如上图所示,MiniKube的提供的优点如下:
- 快捷,自动部署环境
- 无需占用本地资源
- 适用于学习环境
2 kubeadm部署k8s集群 #
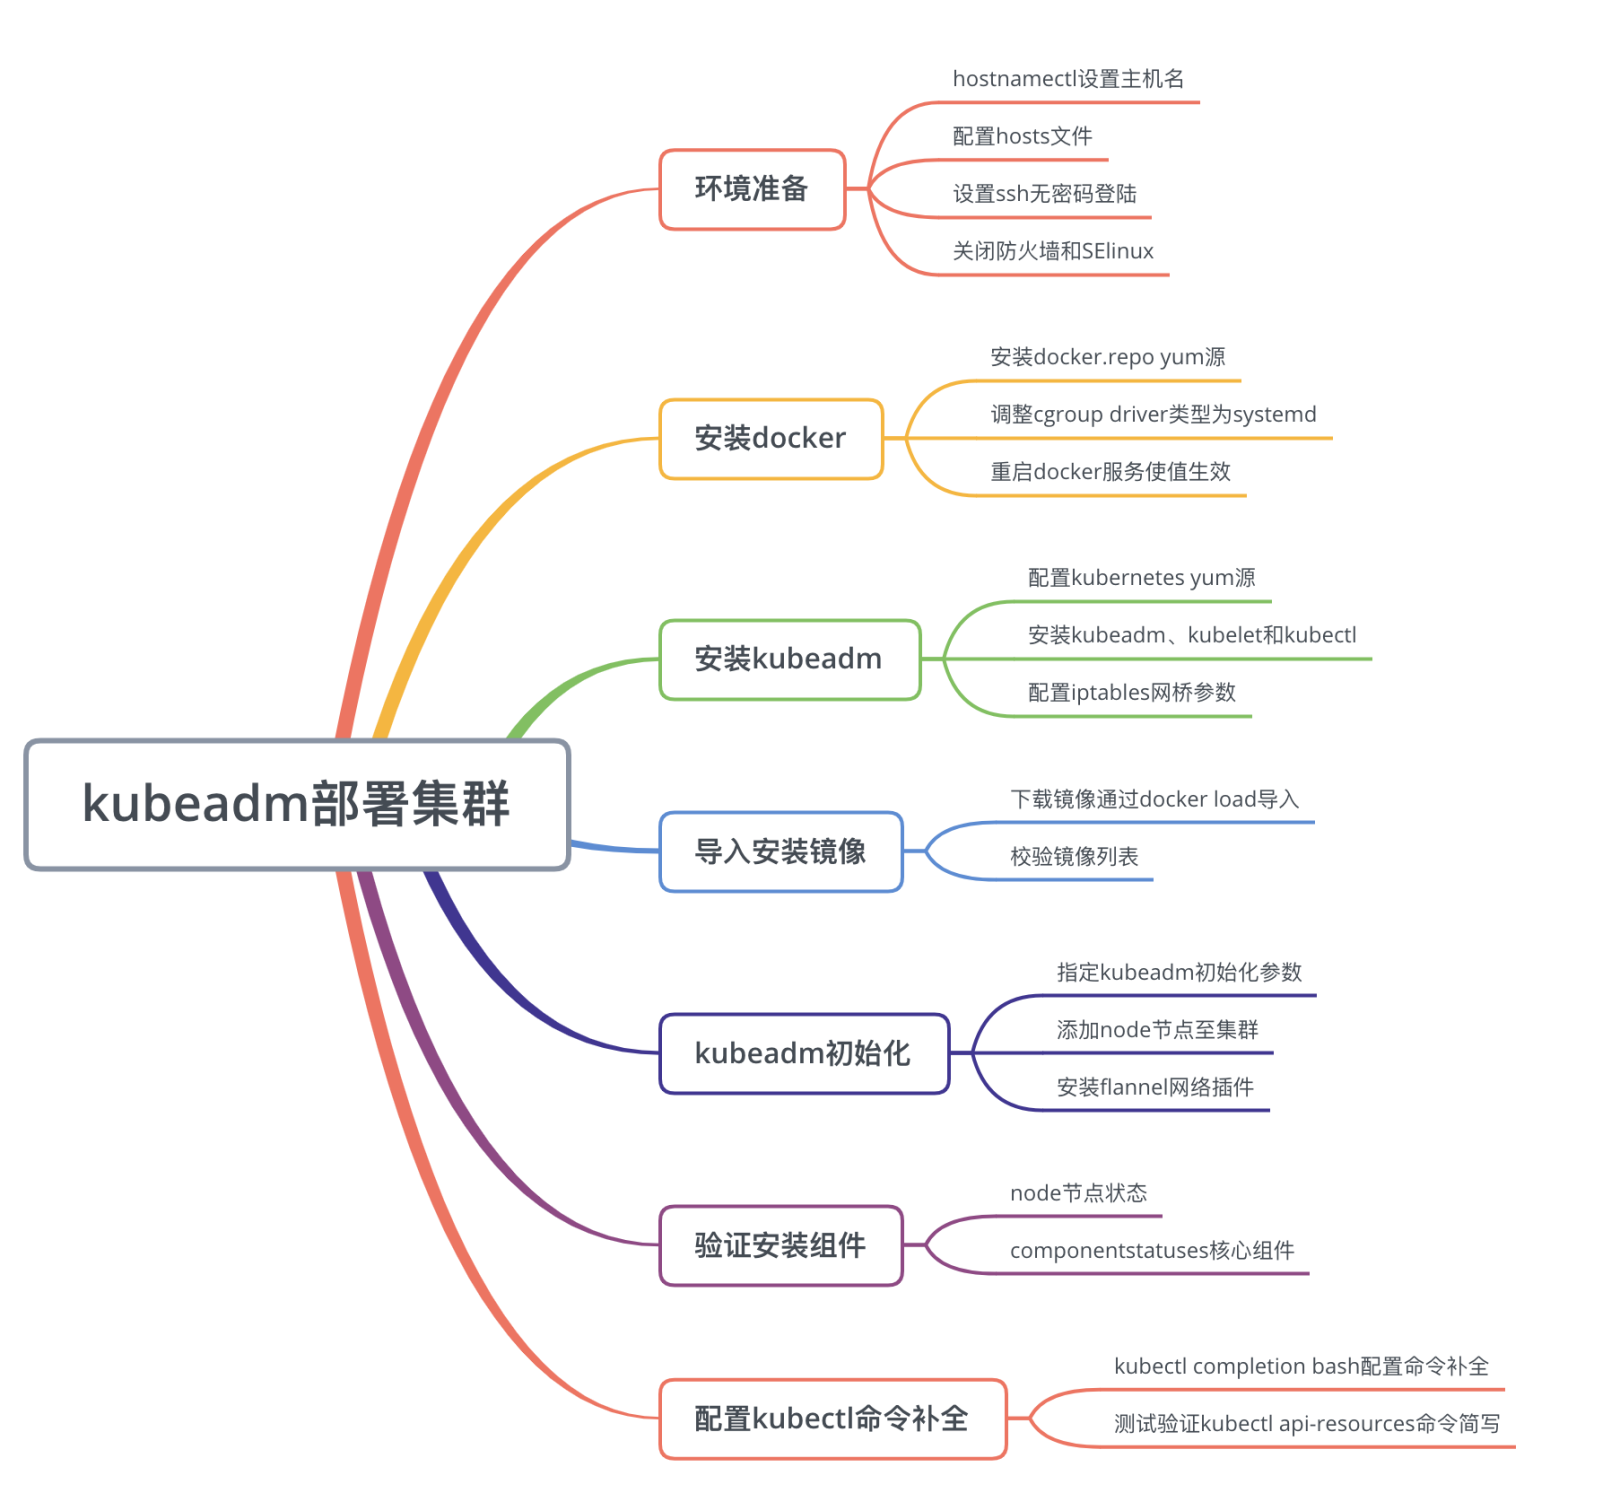
2.1 环境说明和准备 #
【软件版本】
| 软件名 | 软件版本 |
|---|---|
| OS | CentOS Linux release 7.6.1810 (Core) |
| Docker | docker-ce-18.03.1.ce-1.el7 |
| Kubernetes | 1.14.1 |
| Kubeadm | kubeadm-1.14.1-0.x86_64 |
| etcd | 3.3.10 |
| flannel | v0.11.0 |
【环境说明】
三台机器均为腾讯云上购买的CVM(Cloud Virtual Machine),机器配置是2vcpu+4G memory+50G disk
| 主机名 | 角色 | IP地址 | 软件 |
|---|---|---|---|
| node-1 | master | 10.254.100.101 | docker,kubelet,etcd,kube-apiserver,kube-controller-manager,kube-scheduler |
| node-2 | worker | 10.254.100.102 | docker,kubelet,kube-proxy,flannel |
| node-3 | worker | 10.254.100.103 | docker,kubelet,kube-proxy,flannel |
【环境准备】
1、设置主机名,其他两个节点类似设置
1root@VM_100_101_centos ~# hostnamectl set-hostname node-1
2root@VM_100_101_centos ~# hostname
3node-1
2、设置hosts文件,其他两个节点设置相同内容
1root@node-1 ~# vim /etc/hosts
2127.0.0.1 localhost localhost.localdomain
310.254.100.101 node-1
410.254.100.102 node-2
510.254.100.103 node-3
3、设置SSH无密码登录,并通过ssh-copy-id将公钥拷贝到对端
 1#生成密钥对
 2root@node-1 .ssh# ssh-keygen -P ''
 3Generating public/private rsa key pair.
 4Enter file in which to save the key (/root/.ssh/id_rsa):
 5Your identification has been saved in /root/.ssh/id_rsa.
 6Your public key has been saved in /root/.ssh/id_rsa.pub.
 7The key fingerprint is:
 8SHA256:zultDMEL8bZmpbUjQahVjthVAcEkN929w5EkUmPkOrU root@node-1
 9The key's randomart image is:
10+---RSA 2048----+
11|      .=O=+=o.. |
12|     o+o..+.o+  |
13|    .oo=.   o. o |
14|    . . * oo .+  |
15|       oSOo.E  . |
16|       oO.o.     |
17|       o++ .     |
18|       . .o      |
19|        ...      |
20+----SHA256-----+
21
22#拷贝公钥到node-2和node-3节点
23root@node-1 .ssh# ssh-copy-id -i /root/.ssh/id_rsa.pub node-2:
24/usr/bin/ssh-copy-id: INFO: Source of key(s) to be installed: "/root/.ssh/id_rsa.pub"
25The authenticity of host 'node-1 (10.254.100.101)' can't be established.
26ECDSA key fingerprint is SHA256:jLUH0exgyJdsy0frw9R+FiWy+0o54LgB6dgVdfc6SEE.
27ECDSA key fingerprint is MD5:f4:86:a8:0e:a6:03:fc:a6:04:df:91:d8:7a:a7:0d:9e.
28Are you sure you want to continue connecting (yes/no)? yes
29/usr/bin/ssh-copy-id: INFO: attempting to log in with the new key(s), to filter out any that are already installed
30/usr/bin/ssh-copy-id: INFO: 1 key(s) remain to be installed -- if you are prompted now it is to install the new keys
31root@node-1's password:
32Number of key(s) added: 1
33Now try logging into the machine, with:   "ssh 'node-2'"
34and check to make sure that only the key(s) you wanted were added.
4、关闭防火墙和SElinux
1[root@node-1 ~]# systemctl stop firewalld
2[root@node-1 ~]# systemctl disable firewalld
3[root@node-1 ~]# sed -i '/^SELINUX=/ s/enforcing/disabled/g' /etc/selinux/config
4[root@node-1 ~]# setenforce 0
2.2 安装Docker环境 #
1、下载docker的yum源
1[root@node-1 ~]# cd /etc/yum.repos.d/
2[root@node-1 ~]# wget https://download.docker.com/linux/centos/docker-ce.repo
2、设置cgroup driver类型为systemd
 1[root@node-1 ~]# cat > /etc/docker/daemon.json <<EOF
 2> {
 3>  "exec-opts": ["native.cgroupdriver=systemd"],
 4>  "log-driver": "json-file",
 5>  "log-opts": {
 6>  "max-size": "100m"
 7>  },
 8>  "storage-driver": "overlay2",
 9>  "storage-opts": [
10>  "overlay2.override_kernel_check=true"
11>  ]
12> }
13> EOF
3、启动docker服务并验证,可以通过docker info查看docker安装的版本等信息
1[root@node-1 ~]# systemctl restart docker
2[root@node-1 ~]# systemctl enable docker
备注:如果机器不具备上网条件,或者访问docker的yum源仓库很慢,我已将docker相关rpm包依赖包下载到腾讯云cos中,下载链接,可以下载到本地,然后解压缩然后运行yum localinstall进行安装。
2.3 安装kubeadm组件 #
1、安装kubernetes源,国内可以使用阿里的kubernetes源,速度会快一点
1[root@node-1 ~]#cat <<EOF > /etc/yum.repos.d/kubernetes.repo
2[kubernetes]
3name=Kubernetes
4baseurl=https://mirrors.aliyun.com/kubernetes/yum/repos/kubernetes-el7-x86_64
5enabled=1
6gpgcheck=1
7repo_gpgcheck=1
8gpgkey=https://mirrors.aliyun.com/kubernetes/yum/doc/yum-key.gpg https://mirrors.aliyun.com/kubernetes/yum/doc/rpm-package-key.gpg
9EOF
2、安装kubeadm,kubelet,kubectl,会自动安装几个重要依赖包:socat,cri-tools,cni等包
1[root@node-1 ~]# yum install kubeadm-1.14.1-0 kubectl-1.14.1-0 kubelet-1.14.1-0 --disableexcludes=kubernetes -y
3、设置iptables网桥参数
1[root@node-1 ~]# cat <<EOF >  /etc/sysctl.d/k8s.conf
2> net.bridge.bridge-nf-call-ip6tables = 1
3> net.bridge.bridge-nf-call-iptables = 1
4> EOF
5
6[root@node-1 ~]# sysctl --system,然后使用sysctl -a|grep 参数的方式验证是否生效
4、重新启动kubelet服务,使配置生效
1[root@node-1 ~]# systemctl restart kubelet
2[root@node-1 ~]# systemctl enable kubelet
备注:如果本地下载很慢或者无法下载kubernetes中yum源rpm包,可以通过离线方式下载,下载路径
2.4 导入kubernetes镜像 #
1、从cos中下载kubernetes安装镜像,并通过docker load命令将镜像导入到环境中
1[root@node-1 v1.14.1]# docker image load -i etcd:3.3.10.tar
2[root@node-1 v1.14.1]# docker image load -i pause:3.1.tar
3[root@node-1 v1.14.1]# docker image load -i coredns:1.3.1.tar
4[root@node-1 v1.14.1]# docker image load -i flannel:v0.11.0-amd64.tar
5[root@node-1 v1.14.1]# docker image load -i kube-apiserver:v1.14.1.tar
6[root@node-1 v1.14.1]# docker image load -i kube-controller-manager:v1.14.1.tar
7[root@node-1 v1.14.1]# docker image load -i kube-scheduler:v1.14.1.tar
8[root@node-1 v1.14.1]# docker image load -i kube-proxy:v1.14.1.tar
2、检查镜像列表
 1[root@node-1 v1.14.1]# docker image list
 2REPOSITORY                           TAG                 IMAGE ID            CREATED             SIZE
 3k8s.gcr.io/kube-proxy                v1.14.1             20a2d7035165        3 months ago        82.1MB
 4k8s.gcr.io/kube-apiserver            v1.14.1             cfaa4ad74c37        3 months ago        210MB
 5k8s.gcr.io/kube-scheduler            v1.14.1             8931473d5bdb        3 months ago        81.6MB
 6k8s.gcr.io/kube-controller-manager   v1.14.1             efb3887b411d        3 months ago        158MB
 7quay.io/coreos/flannel               v0.11.0-amd64       ff281650a721        6 months ago        52.6MB
 8k8s.gcr.io/coredns                   1.3.1               eb516548c180        6 months ago        40.3MB
 9k8s.gcr.io/etcd                      3.3.10              2c4adeb21b4f        8 months ago        258MB
10k8s.gcr.io/pause                     3.1                 da86e6ba6ca1        19 months ago       742kB
2.5 kubeadm初始化集群 #
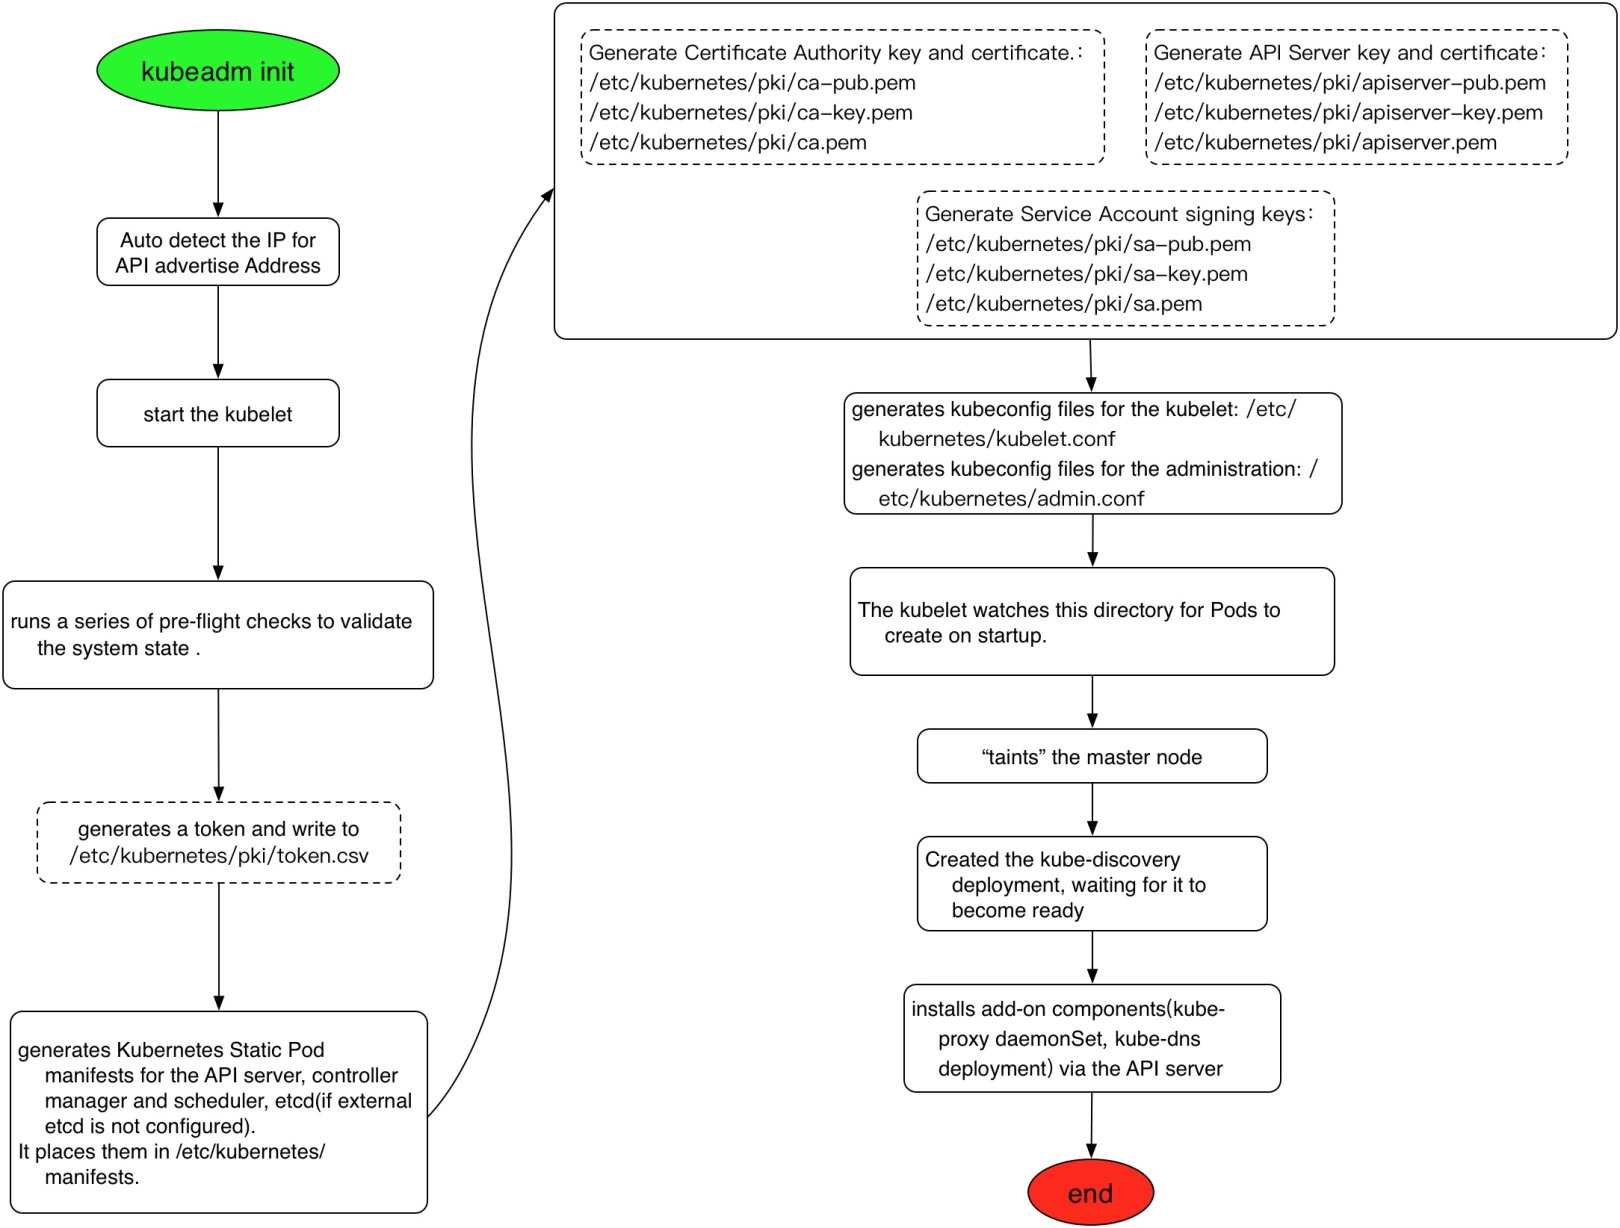
1、 kubeadm初始化集群,需要设置初始参数
- --pod-network-cidr指定pod使用的网段,设置值根据不同的网络plugin选择,本文以flannel为例设置值为10.244.0.0/16
- container runtime可以通过--cri-socket指定socket文件所属路径
- 如果有多个网卡可以通过--apiserver-advertise-address指定master地址,默认会选择访问外网的ip
 1[root@node-1 ~]# kubeadm init --apiserver-advertise-address 10.254.100.101 --apiserver-bind-port 6443 --kubernetes-version 1.14.1 --pod-network-cidr 10.244.0.0/16
 2[init] Using Kubernetes version: v1.14.1
 3[preflight] Running pre-flight checks
 4 [WARNING SystemVerification]: this Docker version is not on the list of validated versions: 18.03.1-ce. Latest validated version: 18.09
 5[preflight] Pulling images required for setting up a Kubernetes cluster
 6[preflight] This might take a minute or two, depending on the speed of your internet connection
 7[preflight] You can also perform this action in beforehand using 'kubeadm config images pull'#下载镜像
 8[kubelet-start] Writing kubelet environment file with flags to file "/var/lib/kubelet/kubeadm-flags.env"
 9[kubelet-start] Writing kubelet configuration to file "/var/lib/kubelet/config.yaml"
10[kubelet-start] Activating the kubelet service
11[certs] Using certificateDir folder "/etc/kubernetes/pki"#生成CA等证书
12[certs] Generating "ca" certificate and key
13[certs] Generating "apiserver" certificate and key
14[certs] apiserver serving cert is signed for DNS names [node-1 kubernetes kubernetes.default kubernetes.default.svc kubernetes.default.svc.cluster.local] and IPs [10.96.0.1 10.254.100.101]
15[certs] Generating "apiserver-kubelet-client" certificate and key
16[certs] Generating "etcd/ca" certificate and key
17[certs] Generating "etcd/server" certificate and key
18[certs] etcd/server serving cert is signed for DNS names [node-1 localhost] and IPs [10.254.100.101 127.0.0.1 ::1]
19[certs] Generating "apiserver-etcd-client" certificate and key
20[certs] Generating "etcd/peer" certificate and key
21[certs] etcd/peer serving cert is signed for DNS names [node-1 localhost] and IPs [10.254.100.101 127.0.0.1 ::1]
22[certs] Generating "etcd/healthcheck-client" certificate and key
23[certs] Generating "front-proxy-ca" certificate and key
24[certs] Generating "front-proxy-client" certificate and key
25[certs] Generating "sa" key and public key
26[kubeconfig] Using kubeconfig folder "/etc/kubernetes"
27[kubeconfig] Writing "admin.conf" kubeconfig file
28[kubeconfig] Writing "kubelet.conf" kubeconfig file
29[kubeconfig] Writing "controller-manager.conf" kubeconfig file
30[kubeconfig] Writing "scheduler.conf" kubeconfig file
31[control-plane] Using manifest folder "/etc/kubernetes/manifests"#生成master节点静态pod配置文件
32[control-plane] Creating static Pod manifest for "kube-apiserver"
33[control-plane] Creating static Pod manifest for "kube-controller-manager"
34[control-plane] Creating static Pod manifest for "kube-scheduler"
35[etcd] Creating static Pod manifest for local etcd in "/etc/kubernetes/manifests"
36[wait-control-plane] Waiting for the kubelet to boot up the control plane as static Pods from directory "/etc/kubernetes/manifests". This can take up to 4m0s
37[apiclient] All control plane components are healthy after 18.012370 seconds
38[upload-config] storing the configuration used in ConfigMap "kubeadm-config" in the "kube-system" Namespace
39[kubelet] Creating a ConfigMap "kubelet-config-1.14" in namespace kube-system with the configuration for the kubelets in the cluster
40[upload-certs] Skipping phase. Please see --experimental-upload-certs
41[mark-control-plane] Marking the node node-1 as control-plane by adding the label "node-role.kubernetes.io/master=''"
42[mark-control-plane] Marking the node node-1 as control-plane by adding the taints [node-role.kubernetes.io/master:NoSchedule]
43[bootstrap-token] Using token: r8n5f2.9mic7opmrwjakled
44[bootstrap-token] Configuring bootstrap tokens, cluster-info ConfigMap, RBAC Roles#配置RBAC授权
45[bootstrap-token] configured RBAC rules to allow Node Bootstrap tokens to post CSRs in order for nodes to get long term certificate credentials
46[bootstrap-token] configured RBAC rules to allow the csrapprover controller automatically approve CSRs from a Node Bootstrap Token
47[bootstrap-token] configured RBAC rules to allow certificate rotation for all node client certificates in the cluster
48[bootstrap-token] creating the "cluster-info" ConfigMap in the "kube-public" namespace
49[addons] Applied essential addon: CoreDNS
50[addons] Applied essential addon: kube-proxy
51Your Kubernetes control-plane has initialized successfully!
52To start using your cluster, you need to run the following as a regular user:
53 mkdir -p $HOME/.kube #配置环境变量配置文件
54 sudo cp -i /etc/kubernetes/admin.conf $HOME/.kube/config
55 sudo chown $(id -u):$(id -g) $HOME/.kube/config
56You should now deploy a pod network to the cluster.
57Run "kubectl apply -f [podnetwork].yaml" with one of the options listed at: #安装网络插件
58 https://kubernetes.io/docs/concepts/cluster-administration/addons/
59Then you can join any number of worker nodes by running the following on each as root:
60kubeadm join 10.254.100.101:6443 --token r8n5f2.9mic7opmrwjakled \ #添加节点命令,优先记录下来
61 --discovery-token-ca-cert-hash sha256:16e383c8abff6233021331944080087f0514ddd15d96c65d19443b0af02d64ab
通过kubeadm init --apiserver-advertise-address 10.254.100.101 --apiserver-bind-port 6443 --kubernetes-version 1.14.1 --pod-network-cidr 10.244.0.0/16安装命令,显示了kubeadm安装过程中的一些重要步骤:下载镜像,生成证书,生成配置文件,配置RBAC授权认证,配置环境变量,安装网络插件指引,添加node指引配置文件。
2、生成kubectl环境配置文件
1[root@node-1 ~]# mkdir /root/.kube
2[root@node-1 ~]# cp -i /etc/kubernetes/admin.conf /root/.kube/config
3[root@node-1 ~]# kubectl get nodes
4NAME  STATUS  ROLES AGE  VERSION
5node-1  NotReady  master  6m29s  v1.14.1
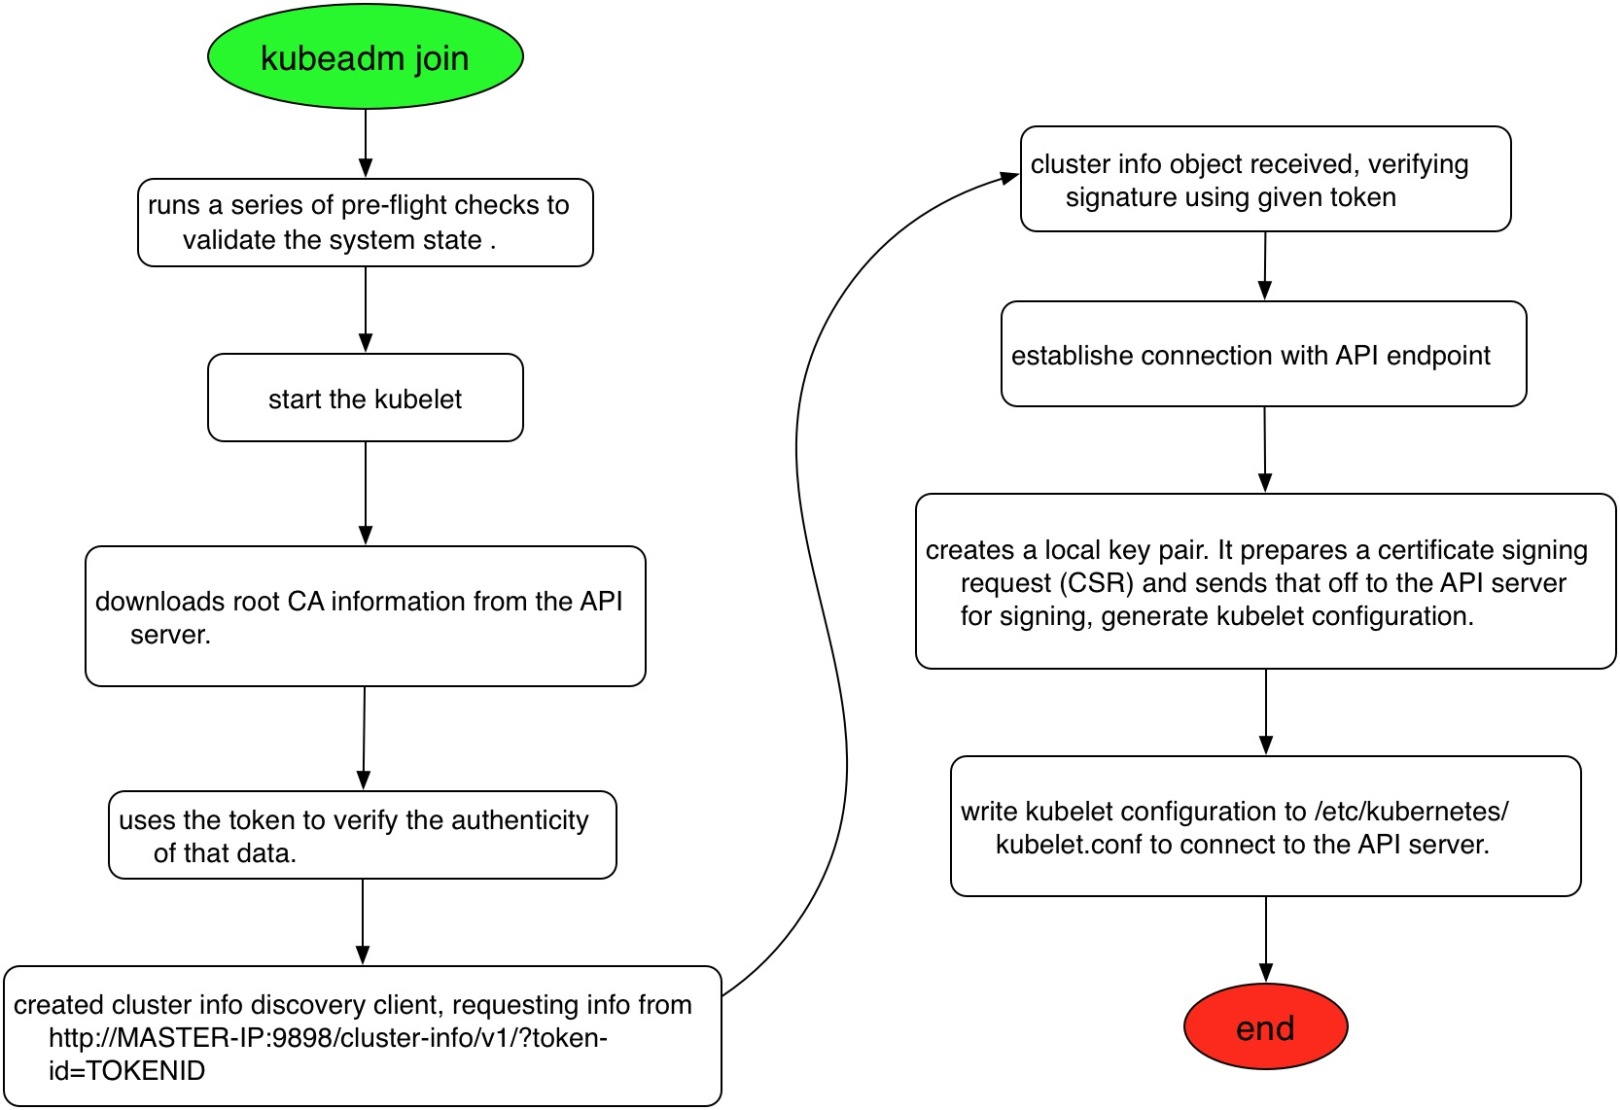
3、添加node节点,将另外两个节点加入到集群中,复制上述的添加节点命令到指定节点添加即可。
 1[root@node-3 ~]# kubeadm join 10.254.100.101:6443 --token r8n5f2.9mic7opmrwjakled \
 2>     --discovery-token-ca-cert-hash sha256:16e383c8abff6233021331944080087f0514ddd15d96c65d19443b0af02d64ab
 3[preflight] Running pre-flight checks
 4	[WARNING SystemVerification]: this Docker version is not on the list of validated versions: 18.03.1-ce. Latest validated version: 18.09
 5[preflight] Reading configuration from the cluster...
 6[preflight] FYI: You can look at this config file with 'kubectl -n kube-system get cm kubeadm-config -oyaml'
 7[kubelet-start] Downloading configuration for the kubelet from the "kubelet-config-1.14" ConfigMap in the kube-system namespace
 8[kubelet-start] Writing kubelet configuration to file "/var/lib/kubelet/config.yaml"
 9[kubelet-start] Writing kubelet environment file with flags to file "/var/lib/kubelet/kubeadm-flags.env"
10[kubelet-start] Activating the kubelet service
11[kubelet-start] Waiting for the kubelet to perform the TLS Bootstrap...
12
13This node has joined the cluster:
14* Certificate signing request was sent to apiserver and a response was received.
15* The Kubelet was informed of the new secure connection details.
16
17Run 'kubectl get nodes' on the control-plane to see this node join the cluster.
18
19以此类推到node-2节点添加即可,添加完之后通过kubectl get nodes验证,此时由于还没有安装网络plugin,
20所有的node节点均显示NotReady状态:
21[root@node-1 ~]# kubectl get nodes
22NAME     STATUS     ROLES    AGE     VERSION
23node-1   NotReady   master   16m     v1.14.1
24node-2   NotReady   <none>   4m34s   v1.14.1
25node-3   NotReady   <none>   2m10s   v1.14.1
4、安装网络plugin,kubernetes支持多种类型网络插件,要求网络支持CNI插件即可,CNI是Container Network Interface,要求kubernetes的中pod网络访问方式:
- node和node之间网络互通
- pod和pod之间网络互通
- node和pod之间网络互通
不同的CNI plugin支持的特性有所差别。kubernetes支持多种开源的网络CNI插件,常见的有flannel、calico、canal、weave等,flannel是一种overlay的网络模型,通过vxlan隧道方式构建tunnel网络,实现k8s中网络的互联,后续在做介绍,如下是安装过程:
 1[root@node-1 ~]# kubectl apply -f https://raw.githubusercontent.com/coreos/flannel/62e44c867a2846fefb68bd5f178daf4da3095ccb/Documentation/kube-flannel.yml
 2podsecuritypolicy.extensions/psp.flannel.unprivileged created
 3clusterrole.rbac.authorization.k8s.io/flannel created
 4clusterrolebinding.rbac.authorization.k8s.io/flannel created
 5serviceaccount/flannel created
 6configmap/kube-flannel-cfg created
 7daemonset.extensions/kube-flannel-ds-amd64 created
 8daemonset.extensions/kube-flannel-ds-arm64 created
 9daemonset.extensions/kube-flannel-ds-arm created
10daemonset.extensions/kube-flannel-ds-ppc64le created
11daemonset.extensions/kube-flannel-ds-s390x created
5、通过上述输出可知道,部署flannel 需要RBAC授权,配置configmap和daemonset,其中Daemonset能够适配各种类型的CPU架构,默认安装了多个,一般是adm64即可,可以将上述的url下载编辑,保留kube-flannel-ds-amd64这个daemonset即可,或者将其删除
 1#查看flannel安装的daemonsets
 2[root@node-1 ~]# kubectl get daemonsets -n kube-system
 3NAME                      DESIRED   CURRENT   READY   UP-TO-DATE   AVAILABLE   NODE SELECTOR                     AGE
 4kube-flannel-ds-amd64     3         3         3       3            3           beta.kubernetes.io/arch=amd64     2m34s
 5kube-flannel-ds-arm       0         0         0       0            0           beta.kubernetes.io/arch=arm       2m34s
 6kube-flannel-ds-arm64     0         0         0       0            0           beta.kubernetes.io/arch=arm64     2m34s
 7kube-flannel-ds-ppc64le   0         0         0       0            0           beta.kubernetes.io/arch=ppc64le   2m34s
 8kube-flannel-ds-s390x     0         0         0       0            0           beta.kubernetes.io/arch=s390x     2m34s
 9kube-proxy                3         3         3       3            3           <none>                            30m
10
11#删除不需要的damonsets
12[root@node-1 ~]# kubectl delete daemonsets kube-flannel-ds-arm kube-flannel-ds-arm64 kube-flannel-ds-ppc64le kube-flannel-ds-s390x -n kube-system
13daemonset.extensions "kube-flannel-ds-arm" deleted
14daemonset.extensions "kube-flannel-ds-arm64" deleted
15daemonset.extensions "kube-flannel-ds-ppc64le" deleted
16daemonset.extensions "kube-flannel-ds-s390x" deleted
6、此时再验证node的安装情况,所有节点均已显示为Ready状态,安装完毕!
1[root@node-1 ~]# kubectl get nodes
2NAME     STATUS   ROLES    AGE   VERSION
3node-1   Ready    master   29m   v1.14.1
4node-2   Ready    <none>   17m   v1.14.1
5node-3   Ready    <none>   15m   v1.14.1
2.6 验证kubernetes组件 #
1、验证node状态,获取当前安装节点,可以查看到状态, 角色,启动市场,版本,
1[root@node-1 ~]# kubectl get nodes
2NAME     STATUS   ROLES    AGE   VERSION
3node-1   Ready    master   46m   v1.14.1
4node-2   Ready    <none>   34m   v1.14.1
5node-3   Ready    <none>   32m   v1.14.1
2、查看kubernetse服务组件状态,包括scheduler,controller-manager,etcd
1[root@node-1 ~]# kubectl get componentstatuses
2NAME  STATUS MESSAGE  ERROR
3scheduler Healthy  ok
4controller-manager  Healthy  ok
5etcd-0  Healthy  {"health":"true"}
3、查看pod的情况,master中的角色包括kube-apiserver,kube-scheduler,kube-controller-manager,etcd,coredns以pods形式部署在集群中,worker节点的kube-proxy也以pod的形式部署。实际上pod是以其他控制器如daemonset的形式控制的。
 1[root@node-1 ~]# kubectl get pods -n kube-system
 2NAME  READY  STATUS RESTARTS  AGE
 3coredns-fb8b8dccf-hrqm8 1/1  Running  0 50m
 4coredns-fb8b8dccf-qwwks 1/1  Running  0 50m
 5etcd-node-1 1/1  Running  0 48m
 6kube-apiserver-node-1 1/1  Running  0 49m
 7kube-controller-manager-node-1  1/1  Running  0 49m
 8kube-proxy-lfckv  1/1  Running  0 38m
 9kube-proxy-x5t6r  1/1  Running  0 50m
10kube-proxy-x8zqh  1/1  Running  0 36m
11kube-scheduler-node-1 1/1  Running  0 49m
2.7 配置kubectl命令补全 #
使用kubectl和kubernetes交互时候可以使用缩写模式也可以使用完整模式,如kubectl get nodes和kubectl get no能实现一样的效果,为了提高工作效率,可以使用命令补全的方式加快工作效率。
1、生成kubectl bash命令行补全shell
 1[root@node-1 ~]# kubectl completion bash >/etc/kubernetes/kubectl.sh
 2[root@node-1 ~]# echo "source /etc/kubernetes/kubectl.sh" >>/root/.bashrc
 3[root@node-1 ~]# cat /root/.bashrc
 4# .bashrc
 5
 6# User specific aliases and functions
 7
 8alias rm='rm -i'
 9alias cp='cp -i'
10alias mv='mv -i'
11
12# Source global definitions
13if [ -f /etc/bashrc ]; then
14	. /etc/bashrc
15fi
16source /etc/kubernetes/kubectl.sh #添加环境变量配置
2、加载shell环境变量,使配置生效
1[root@node-1 ~]# source /etc/kubernetes/kubectl.sh
3、校验命令行补全,命令行中输入kubectl get co再按TAB键就能自动补全了
1[root@node-1~]# kubectl get co componentstatuses configmaps  controllerrevisions.apps
2[root@node-1~]# kubectl get componentstatuses
除了支持命令行补全之外,kubectl还支持命令简写,如下是一些常见的命令行检测操作,更多通过kubectl api-resources命令获取,SHORTNAMES显示的是子命令中的简短用法。
- kubectl get componentstatuses,简写kubectl get cs获取组件状态
- kubectl get nodes,简写kubectl get no获取node节点列表
- kubectl get services,简写kubectl get svc获取服务列表
- kubectl get deployments,简写kubectl get deploy获取deployment列表
- kubectl get statefulsets,简写kubectl get sts获取有状态服务列表
参考文档 #
- Container Runtime安装文档:https://kubernetes.io/docs/setup/production-environment/container-runtimes/
- kubeadm安装:https://kubernetes.io/docs/setup/production-environment/tools/kubeadm/install-kubeadm/
- 初始化kubeadm集群:https://kubernetes.io/docs/setup/production-environment/tools/kubeadm/create-cluster-kubeadm/#pod-network
『 转载 』该文章来源于网络,侵删。